

Welcome to my guide on how to cook ribs in the Masterbuilt 140b Electric Smoker. As an avid barbecue enthusiast, I’ve spent countless hours perfecting my technique with this fantastic piece of equipment.
Today, I’ll walk you through my process for creating mouthwatering, tender ribs using this standard 40-inch digital smoker.
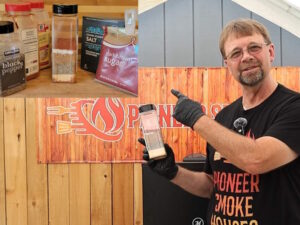
Essential Equipment and Ingredients for Smoking Ribs in the Masterbuilt 140b
- Masterbuilt 140b Electric Smoker
- Rack of Spare Ribs
- Instant-Read Thermometer
- Grill Mat
- Hickory Wood Chips
- Extra Wide Aluminum Foil
- Apple Juice for Adding Moisture
- Ingredients for Seasoning Mix:
- Garlic powder
- Black pepper
- Dark brown sugar
- Kosher salt
- Smoked paprika
- Ingredients for Spritz:
- Water
- Apple juice
- Apple cider vinegar
Optional Modifications to the Masterbuilt 140b Electric Smoker
Before we begin, I should mention that I’ve made a couple of modifications to my smoker:
- I’ve replaced the standard controller with a PID controller for more precise temperature control.
- I’ve added a small chimney takeoff to help the smoke rise and exit the unit more easily.
While these modifications aren’t necessary, they can improve the smoking process and overall results.
Preheating the Smoker
The first thing I do is preheat the smoker. Set the temperature to 215°F when using the factory digital controller. This ensures the smoker is preheated to the right temperature for cooking. I add a half pan of wood chips during preheating to re-season the smoker for every cook.
If I’ve done a thorough cleaning between smokes, I run a full pan or more of wood chips to enhance the smoke flavor. Preheat for 30 minutes to an hour for the most consistent temperature.
Preparing the Ribs
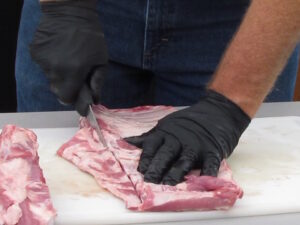
[photo = Trimming the rack of spare ribs into a St. Louis cut]
Now, let’s prepare the ribs. We’ll trim a spare rib into a St. Louis cut:
Inspecting and Cutting Off the Ends
- Lay out the rack of ribs on your cutting board.
- Examine the overall shape and identify parts that need trimming.
- Cut off the ends of the ribs, as these small pieces won’t cook evenly.
- Trim any folded sections to ensure the rack is flat and even.
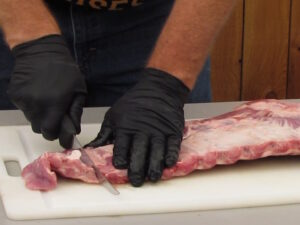
Trimming the Rib Tips and Removing Excess Flap
- Cut off the rib tips to square up the rack.
- Trim excess meat or fat on the rib side.
Removing the Membrane
- Flip the ribs over to the bone side.
- Use a dull knife to insert between the membrane and a bone.
- Once you have a good grip, pull off the membrane. You can use a paper towel for better grip if needed.
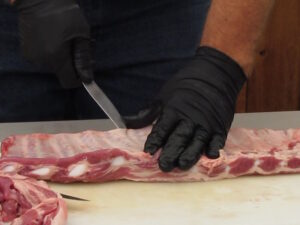
Final Trimming
- Check for any remaining large pieces of fat.
- Trim these as necessary, but don’t overdo it. Some fat will render out during cooking and add flavor.
(For more detailed information on rib preparation, check out my rib preparation video series.)
Seasoning the Ribs
After trimming, it’s time to season our ribs. This step is crucial for developing that perfect flavor profile.
Mixing the Seasoning
- Prepare the seasoning mix by combining the following:
- Two parts garlic powder
- Two parts black pepper
- Two parts dark brown sugar
- One part kosher salt (consider using less if you prefer)
- One part smoked paprika (you can add more if you reduce the salt)
- Sift the brown sugar beforehand to prevent clumps.
- Place all ingredients in a container and shake well to distribute evenly.
- Double-check that the brown sugar isn’t clumped up. If needed, shake vigorously to break up smaller clumps.
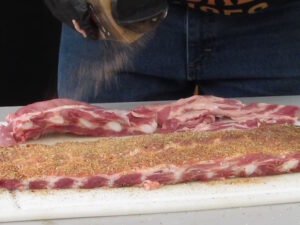
Seasoning the Ribs
- Open the shaker and lightly sprinkle the seasoning mix on the back side of the ribs first.
[photo = Applying seasoning to the back side of the ribs]
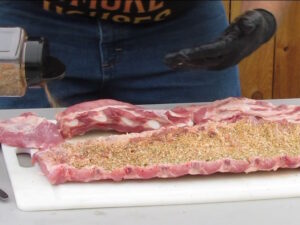
- Use a light hand to keep most of the seasoning on the ribs, not on the cutting board.
- Press the seasoning into the ribs to help it adhere better.
- Flip the ribs over and lightly season the edges.
[photo = Applying seasoning to the edges and middle of the ribs]
- Sprinkle the seasoning over the middle of the ribs, ensuring even coverage.
- Again, press the seasoning into the ribs for better adhesion.
Hydrating the Seasoning
- Allow the seasoned ribs to rest for about 10 minutes. This lets the seasoning hydrate and adhere well to the meat.
- If you notice any areas that need more seasoning, add a bit more. Be cautious not to overdo it, especially with the salt.
Preparing the Spritz
Now is a good time to prepare a spritz; let’s go through the steps:
Ingredients for the Spritz:
- 1 oz water
- 1 oz apple juice
- 1 oz apple cider vinegar
Optional Additions:
- Optionally, add half a part of your dry rub or barbecue sauce to the mixture. For example, add 0.5 oz of barbecue sauce to 1 oz of each liquid ingredient.
Mixing the Spritz:
- Shake the bottle well to ensure all ingredients are thoroughly mixed.
By following these steps, you will have a well-prepared spritz for smoking ribs.
Smoking the Ribs
The cooking process for smoking ribs involves several key steps to ensure they are tender, flavorful, and have a rich, smoky taste. Each stage, from starting the smoker to the final rest, is crucial for achieving the perfect ribs.
Time to Start the Ribs
First, raise the smoker’s temperature to 225°F. This temperature is ideal for smoking ribs, as it allows the meat to cook slowly and evenly, ensuring it becomes tender and absorbs the smoky flavor.
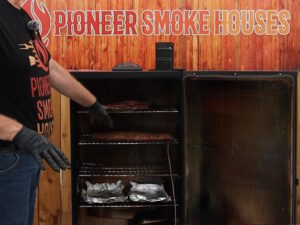
I placed the ribs on a grill mat for easier handling and cleanup. Carefully center the ribs on the middle rack of the smoker.
Positioning the ribs in the middle ensures they receive consistent heat and smoke from all sides, promoting even cooking.
Monitoring the Smoke
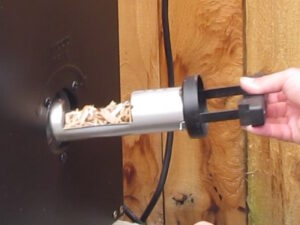
Load hickory wood chips into the smoker using the Masterbuilt load tube. Hickory provides a strong flavor that complements the ribs well. For the first hour, I keep a close eye on the smoker, adding wood chips as needed to maintain a steady smoke.
Here’s a handy tip I’ve learned: leaving the loading tube slightly open improves airflow, which helps the wood chips burn more efficiently. This little trick can make a big difference in maintaining consistent smoke production.
Checking the Ribs
After about an hour and a half, I check the ribs for smoke level and internal temperature using my ThermoPro Lightning instant-read thermometer. I carefully open the smoker door and insert the thermometer probe into the thickest part of the ribs, between two bones, without hitting the bones, as that can cause a false reading. I expect to see a temperature around 160°F at this point.
I also assess the smoke level by looking at the color of the ribs. If they need more smoke, I add another small pan of wood chips. This ensures the ribs continue to develop a rich, smoky flavor.
Finally, this is an excellent time to check the bark. If the seasoning is getting too dry, put on a light spray of the spritz, but go easy to avoid washing off the seasoning.
Wrapping the Ribs
Once your ribs reach 180°F, you might want to wrap them if you prefer your ribs more tender. This step helps to further tenderize the meat by trapping moisture and heat.
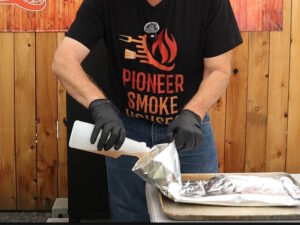
I wrap mine in foil with a bit of liquid to keep them moist. To do this, I first lay out a large sheet of foil and place the ribs in the center. I then tightly wrap the foil around the ribs, leaving one end open like a funnel.
Next, I pour about 1/4 cup of apple juice or your favorite beer into the foil pouch with the ribs through the open end. After adding the liquid, I seal the open end of the foil pouch, making sure to prevent any steam or juices from escaping.
A good seal ensures that the ribs steam in their own juices, making them even more tender. I then place them back in the smoker for another 30 minutes. This additional time allows the ribs to absorb the flavors from the added liquid and become more tender.
Resting
After the final 30 minutes of cooking, I unwrap the ribs and check for tenderness. If they are done to my liking, I remove them from the smoker.
It’s essential to let the ribs rest for a few minutes before serving. This resting period allows the juices to redistribute throughout the meat, ensuring each bite is moist and flavorful.
During this time, you can prepare your serving platter, finish any side dishes, or clean the smoker. After about 5-10 minutes of resting, your ribs are ready to be served and enjoyed!
Conclusion
Smoking ribs in the Masterbuilt 140b Electric Smoker is a rewarding experience that yields delicious results. By following this guide, you will be well on your way to creating mouthwatering, tender ribs with the perfect smoky flavor.
The Masterbuilt 140b proves to be a versatile and reliable tool for smoking ribs and other meats. Its digital controls, spacious interior, and consistent temperature make it an excellent choice for both beginners and experienced smokers alike.